Multi Domain
 Processing Request
Stacks Multi-Domain allows you to manage multiple domain websites under a single dashboard. Manage your websites from a central location, with robust management and publishing options. Publish to one, some, or all of the domains that are associated with your Stacks site. Maintain a central administration while allowing local administrators to manage their domain and content independently.

To set up a Multi-Domain site, follow the following steps:
- Submit a Support Ticket at EBSCO Connect to request your Stacks trial be upgraded to support the second Domain.
- Once completed, you will see a 'Domains' tile appear under the 'System Configuration' tile.
Add Access to the Second Domain to your Administrator User Role
- Navigate to the 'People' tile on your Dashboard
- Select 'Edit User' on your User Name
- Scroll down to 'Domain Access' and check the second Domain
- Click 'Save'
Activate your Second Domain
- Open the System Configuration tile on your dashboard and choose the Domains tile
- In the list, locate the domain you would like to activate
- Domains can be active or inactive and they will only be accessible to non-administrative users if they are active.
Note: The domain you are currently logged into will be listed in bold text.
- To Activate a domain, toggle on the check mark under the Active column next to the domain title
5. Click Save Configuration to save the status of your domain
Configure Your Domain Settings:
- From the Root Domain Dashboard, navigate to the 'System Configuration' tile
- Open the 'Domains' tile
- Click on 'Edit Domain' to enter a name for the second Domain
- Scroll down to 'Label Set' and check 'Alternative Labels'
- Click 'Save Domain Record'
- Now you can go into each Domain and configure each one separately
- Navigate to the 'System Configuration' tile, open the 'Domains' tile
- Click 'Edit Domain'
- Click on the 'Settings' tab at the top of the screen
- Set the desired time zone and language for each Domain
- Note: All settings configured here will override the regular Dashboard settings
- Click on 'Save Domain Settings'
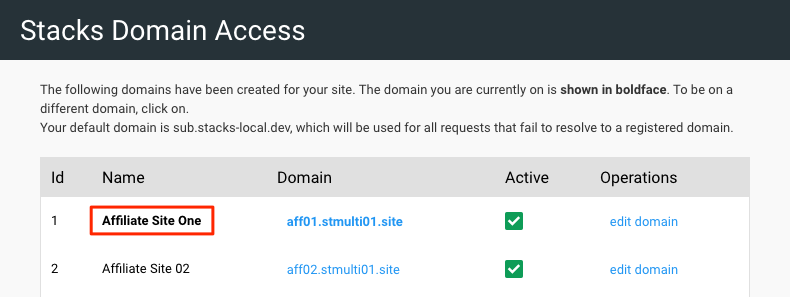
- Navigate to the Domain Administration tile on your dashboard
- In the list, locate the domain you would like to edit
- Click on Edit Domain, under the Operations column next to the domain name
Note: The domain you are currently logged into will appear in the list in bold text
4. By Clicking Edit Domain:
- You can adjust the internal name of each domain
- Change the URL scheme between http:// (unsecured) and https:// (secured)
- Toggle the status of the domain between active and inactive
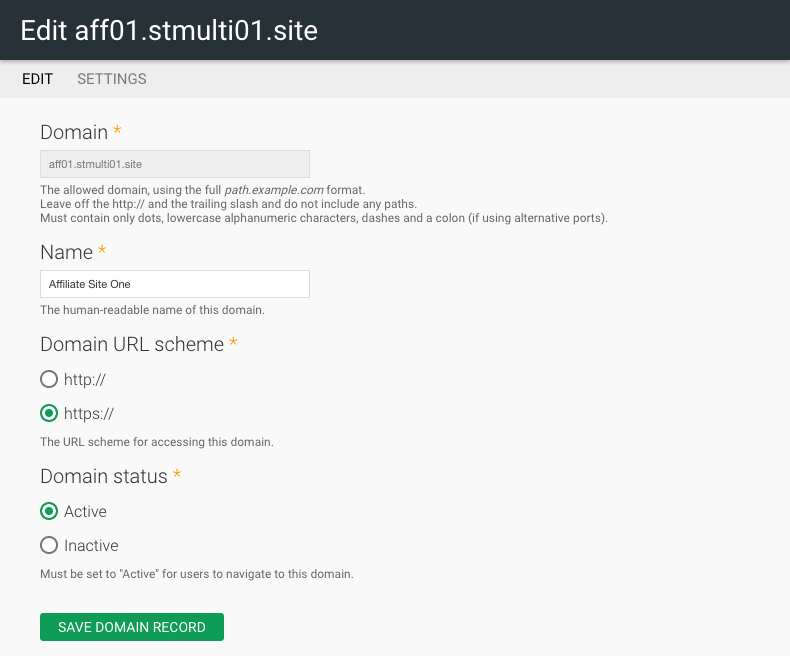
6. After making the desired adjustments be sure to click "Save Domain Record" to save your changes
V 2.2.0
- Open the System Configuration tile on your dashboard and choose the Domains tile
- In the list, locate the domain you would like to disable
- Domains can be active or inactive and they will only be accessible to non-administrative users if they are active.
Note: The domain you are currently logged into will be listed in bold text.

- To disable a domain, toggle off the check mark under the Active column next to the domain title
- Click Save Configuration to save the status of your domain
To set up a Multi-Domain and Multi-Language site, follow the following steps:
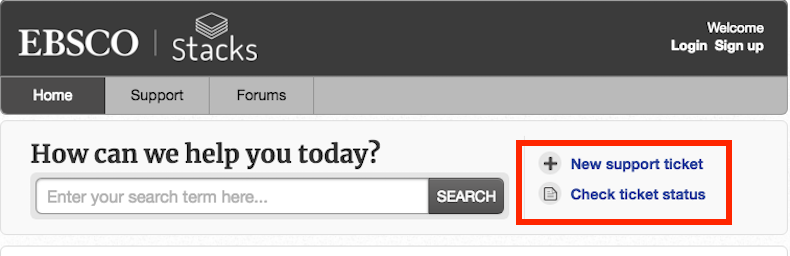
- Submit a Support Ticket at support.stacksdiscovery.com to request your Stacks trial be upgraded to support the second Domain.
- Click on the 'New Support Ticket' button at the top right-hand corner of the screen.
- Once completed, you will see a 'Domains' tile appear under the 'System Configuration' tile
- Add Access to the Second Domain to your Administrator User Role
- Navigate to the 'People' tile on your Dashboard
- Select 'Edit User' on your User Name
- Scroll down to 'Domain Access' and check the second Domain
- Click 'Save'
- Add Your Secondary Language
- From the Root Domain Dashboard, navigate to the 'System Configuration' tile and open the 'Languages' tile
- Click the 'Add A Language' button
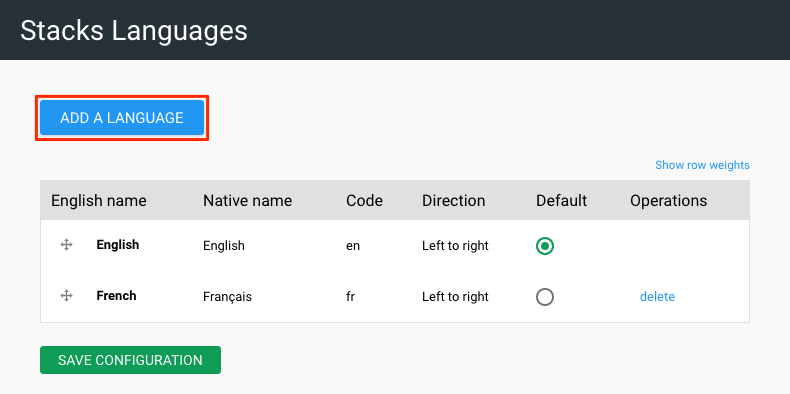
- Select a language from the dropdown list
- Click the 'Add Language' button
- Add as many languages as you want - see the 'Add a Language' article for detailed instructions
- Note: We will set the default language per domain later so it is not important which language is set as the default here.
- Configure Your Domain Settings:
- From the Root Domain Dashboard, navigate to the 'System Configuration' tile
- Open the 'Domains' tile
- Click on 'Edit Domain' to enter a name for the second Domain
- Scroll down to 'Label Set' and check 'Alternative Labels'
- Click 'Save Domain Record'
- Now you can go into each Domain and configure each one separately
- Navigate to the 'System Configuration' tile, open the 'Domains' tile
- Click 'Edit Domain'
- Click on the 'Settings' tab at the top of the screen
- Set the desired time zone and language for each Domain
- Note: All settings configured here will override the regular Dashboard settings
- Click on 'Save Domain Settings'
- Translate Alternative Site Labels
- From the Root Domain Dashboard, navigate to the 'System Configuration' tile
- Open the 'Site Labels' tile and click on 'Alternate Labels' at the very top of your screen
- Enter the translated labels into all the labels fields
- Translate Footer for your Second Domain
- Navigate to the 'System Configuration' tile on your Root Domain Dashboard
- Open the 'Footer' tile and select the 'Second Domain' tab
- Translate content into your preferred language.
- Translate Main Menu for your Second Domain
- Navigate to the 'Menu' tile on your Root Domain Dashboard
- Find 'Main Menu Domain 2' and click on 'List Links'
- 'Edit' each menu item
- Update Top Menu to Support Each Language
- From the Root Domain Dashboard, navigate to the 'Menus' tile
- Find 'Top Menu' can click on 'List Links'
- Edit each menu item
- Add a menu item for each language as the Top Menu is Global
- Once the site goes live, submit a ticket to support.stacksdiscovery.com to show/hide the menu items as appropriate per domain
- Create a New Landing Page in the Secondary Language to use as the front page of the secondary domain
- From the Secondary Domain Dashboard, create your landing page
- To create a new Landing Page to use as the front page of the second domain, you must first create content elements to add to your Landing Page in your chosen language. For Example, you must create Callouts, Sliders, News Articles and more in your chosen language.
- click on the 'Landing Page' tile - and click on 'Add New' Detailed instructions on how to create a Landing Page can be found in our User Manual - Landing Page
Note: Content can only be published to active domains, if you do not select 'Send to all affiliates' or Publish to the domain, you will not have the option to add the content when you are editing a domain that has not been selected. To activate a domain refer to Domain Administration in the User Manual.
- To publish to a specific domain, you must first create the content that you wish to publish, for example: a page
- Create or Edit the content you wish to publish
- Scroll to the "Domain Access Options" fields on the edit screen of your page
- Make sure that "Send to all affiliates" is NOT selected
- Select the domain(s) where you wish to publish your content
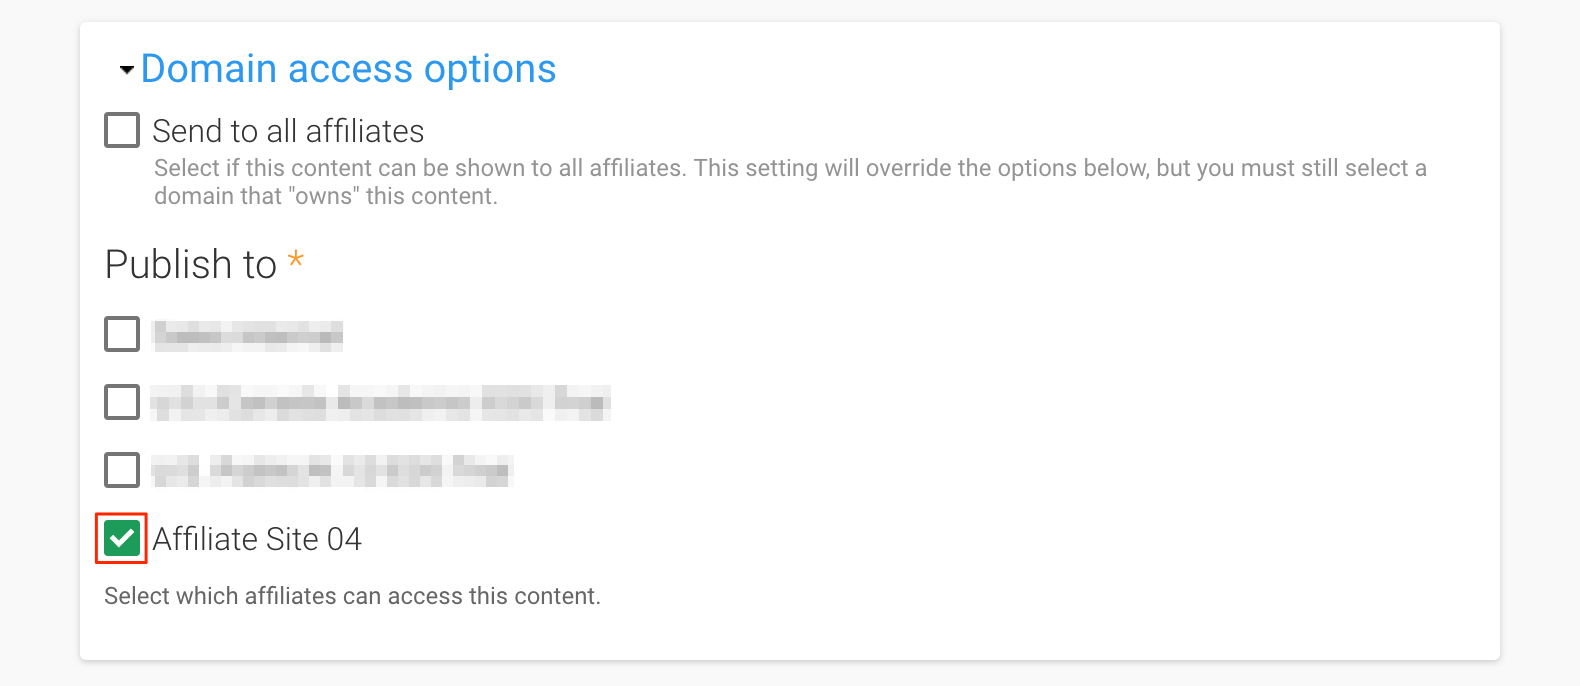
6. Click "Save"
Note: Content can only be published to active domains. To activate a domain refer to Domain Administration in the User Manual.
- To publish to all domains, you must first create the content that you wish to publish, for example: a page
- Create or Edit the content you wish to publish
- Scroll to the "Domain Access Options" fields on the edit screen of your page
- Make sure that "Send to all affiliates" IS selected
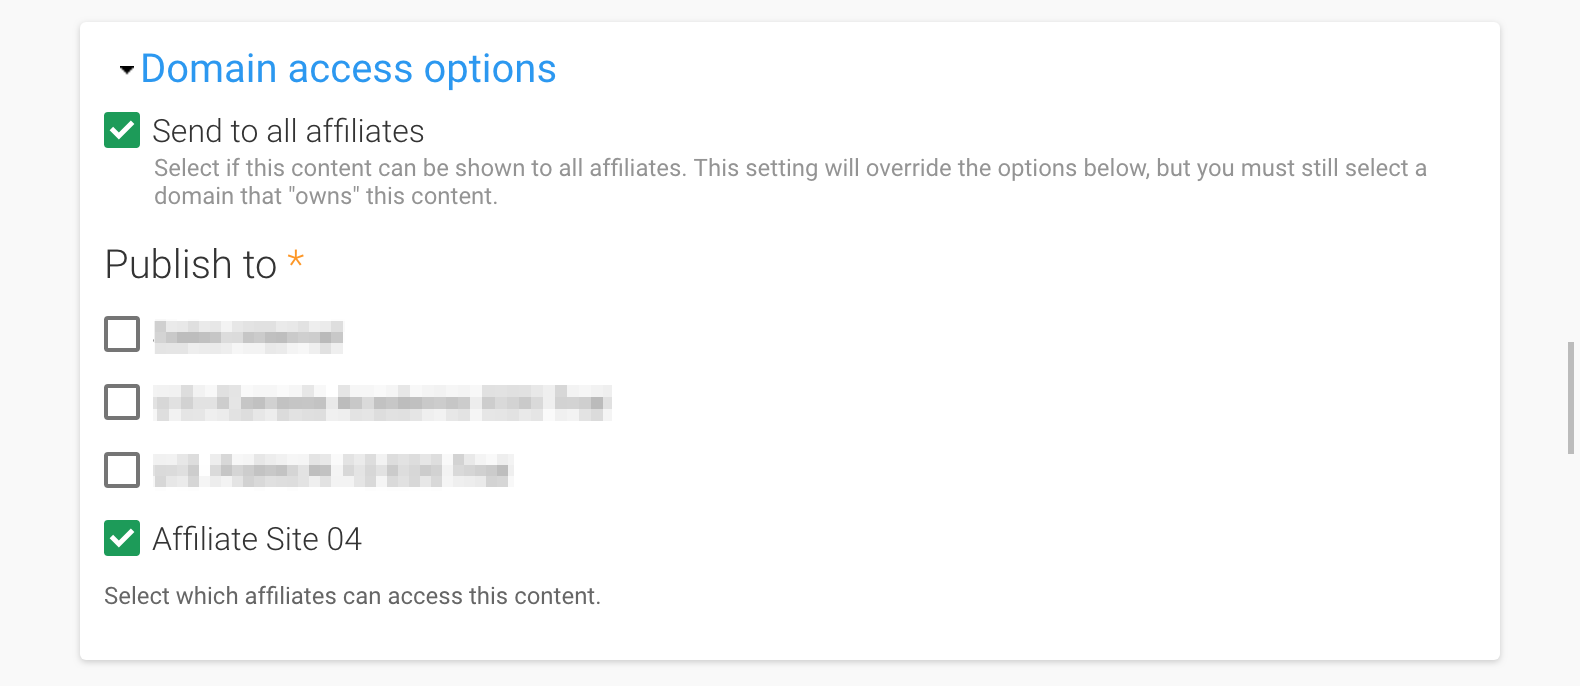
5. Click "Save"
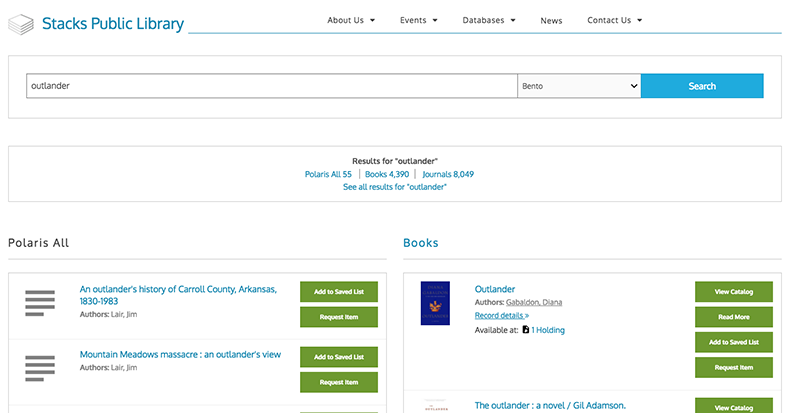
A Bento search will display results sorted by item type. You may choose to include just one type, say books, or many types such as books, academic journals, DVDs, etc. You may also add boxes for news items or website search. Result types are grouped together in Bento ‘boxes’ for easier navigation by users.
Bento Search can be implemented on Multidomain sites. Each site must have an identical number of columns on their Bento page but each site can configure their own content in their individual bento boxes. To create bento searches on multidomain sites:
- Create a Bento Page on each individual site in your multidomain
- Change the number of columns on each Bento page to ensure that all domains have the same number of columns. Instructions for changing column layout on your bento search page (landing page) can be found under column layout
- Begin adding boxes to each Bento search page
Navigate to the 'Search Configuration' tile and open the 'Settings' tile. Choose Bento as a search option. Next, navigate to the multisearch page
-
Multisearch page location = Stacks url + /multisearch eg. www.MyStacksSite.com/multisearch

Click CUSTOMIZE THIS PAGE at the bottom of the window

Click the

Click Bento Search
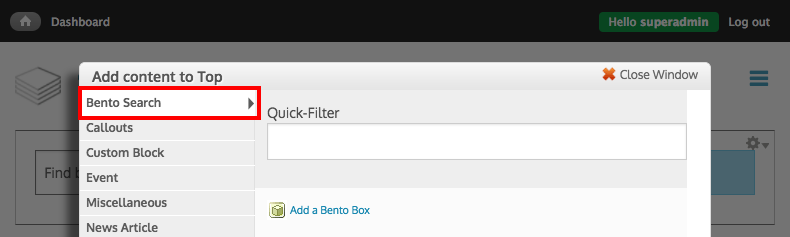
Click Add a Bento Box
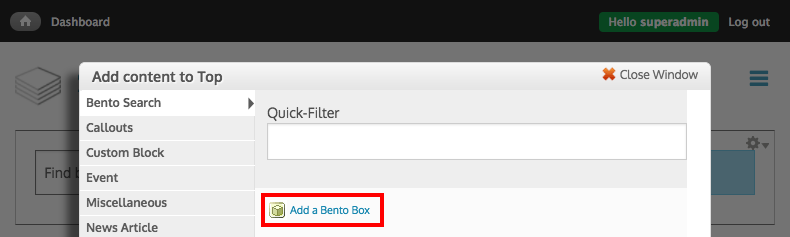
In the ‘Select a Bento Box’ field, select the results type(s) to display
Enter the number of preferred search results to display
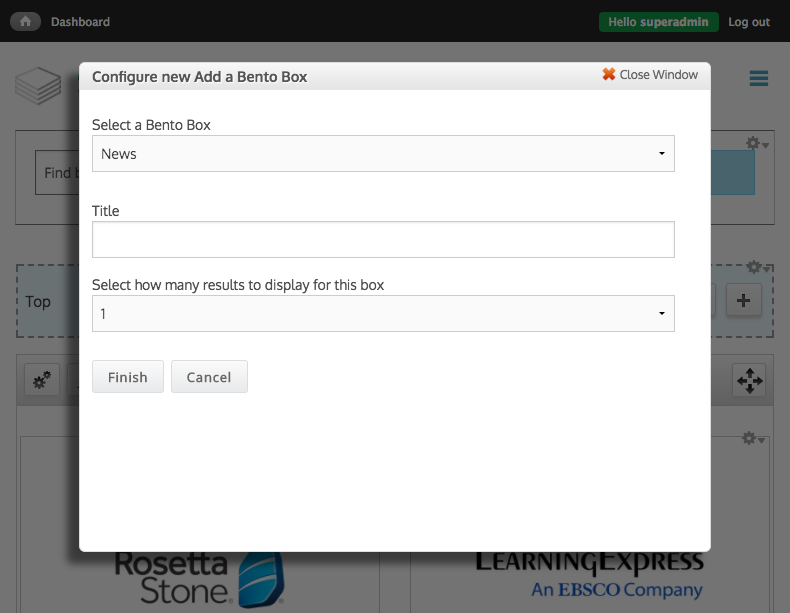
Click FINISH to create the Bento Box
Continue adding Bento Boxes as needed
Click SAVE
By default Stacks will use the Root Domain's homepage as the default homepage for all additional domains. You can modify the homepage for each domain.
-
Log into the domain you want to set the homepage for as an administrator.
-
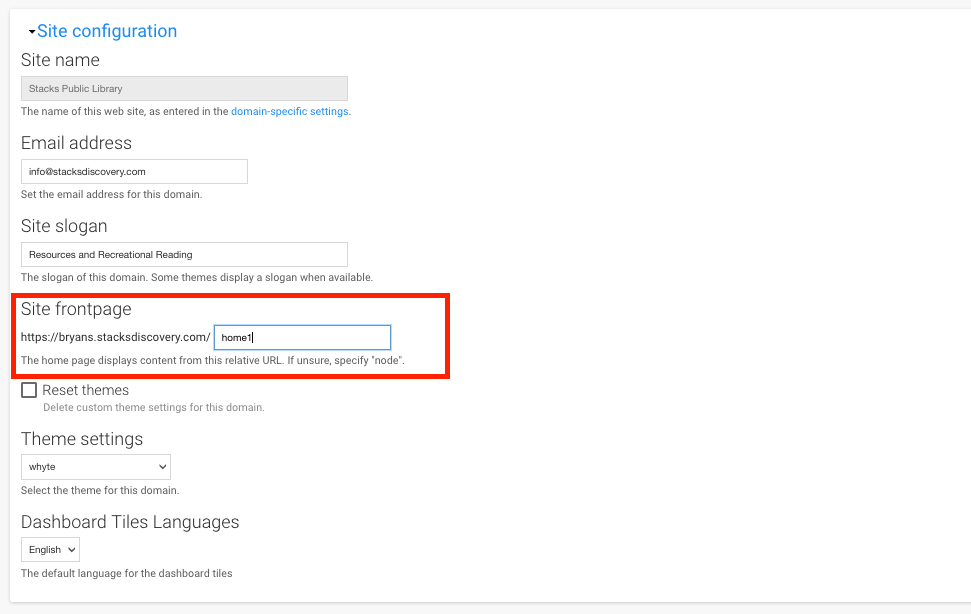
Navigate to the ‘System Configuration’ Tile and open the ‘Site Configuration’ tile.
-
Open the ‘Site Details’ Tab.
-
Click the Here link under the ‘Default Front Page’ field.

-
Complete the relative path of the ‘Site Frontpage’ with the name of the landing page that was previously created
-
Click Save Domain Settings.